Waiting on Proxmox: UPIDs, Tasks and WaitFor in Go
Most Proxmox VE API calls that change something hand you a UPID instead of a result. Here is how go-proxmox turns that string into something you can wait on.
If you start automating Proxmox VE through the API, one thing trips you up first. Almost nothing you ask it to do is finished when the HTTP call returns. Start a VM, clone a template, download an ISO to storage, delete a disk… the response is a single string that looks like a typo. The actual work is happening in a worker process on the node. If your next call depends on that work being done, you have to go find out when it’s done.
I’ve been building that part of go-proxmox over the last couple of
months. The xterm.js post covered the shell side. With the
simpler WaitFor that just landed, I think the shape is settled enough to write up.
The UPID
Here is what a download-url call on my home lab node i7 gave back:
UPID:i7:00303F51:09D93CFE:61CCA568:download:8fd77349e9f6.iso:root@pam:
That is a Unique Process ID, and it’s more useful than it looks. It’s colon separated and every field means something:
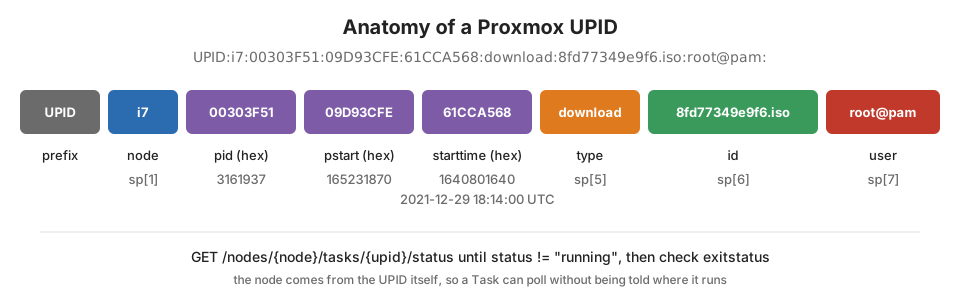
The middle three are hex:
00303F51is the PID of the worker on the node (3161937).09D93CFEis the process start time in clock ticks. Proxmox uses it to tell PIDs apart after they get reused.61CCA568is a unix timestamp (1640801640). That’s December 29th 2021 at 18:14 UTC, which is when I was testing this.
The rest is plain text. There’s the task type, then an id, then the user that started it. The id is the VMID for VM tasks and the file name for a download.
The important bit is the node. Task status lives at /nodes/{node}/tasks/{upid}/status. If you parse the node out of
the UPID, you can poll it without the caller having to remember where the work was scheduled. That’s the entire reason
NewTask exists:
func NewTask(upid UPID, client *Client) *Task {
	if upid == "" {
		return nil
	}

	task := &Task{
		UPID:   upid,
		client: client,
	}

	sp := strings.Split(string(task.UPID), ":")
	if len(sp) == 0 || len(sp) < 7 {
		return task
	}

	task.Node = sp[1]
	task.Type = sp[5]
	task.ID = sp[6]
	task.User = sp[7]

	return task
}
Every method in the client that kicks off work now returns a *Task built this way instead of the raw string. VM start
is the simplest example:
func (v *VirtualMachine) Start() (*Task, error) {
	var upid UPID
	if err := v.client.Post(fmt.Sprintf("/nodes/%s/qemu/%d/status/start", v.Node, v.VMID), nil, &upid); err != nil {
		return nil, err
	}

	return NewTask(upid, v.client), nil
}
The response body for these calls is {"data": "UPID:..."}. A UPID is just a string type, so unmarshalling
straight into one works with no special handling.
Ping, Wait and WaitFor
Once you have a *Task, Ping refreshes it from the status endpoint. The status payload has status, which is
running or stopped. Once it’s stopped it also has exitstatus, which is OK or the error text.
func (t *Task) Ping() error {
	return t.client.Get(fmt.Sprintf("/nodes/%s/tasks/%s/status", t.Node, t.UPID), t)
}
Note it unmarshals right back into the task itself. The status response has the same fields the UPID encodes plus the ones that change. So the struct just keeps filling in as you poll it.
Wait is a polling loop with an interval and a max. I went with a plain select on a time.After. I wanted the
timeout to be a real error you can check for, not a silent return:
func (t *Task) Wait(interval, max time.Duration) error {
	// ping it quick to fill in all the details we need in case they're not there
	t.Ping()
	t.client.log.Debugf("waiting for %s, checking every %fs for %fs", t.UPID, interval.Seconds(), max.Seconds())

	timeout := time.After(max)
	for {
		select {
		case <-timeout:
			t.client.log.Debugf("timed out waiting for task %s for %fs", t.UPID, max.Seconds())
			return ErrTimeout
		default:
			if err := t.Ping(); err != nil {
				return err
			}

			if t.Status != TaskRunning {
				t.client.log.Debugf("task %s has completed with status %s", t.UPID, t.Status)
				return nil
			}
			t.client.log.Debugf("waiting on task %s sleeping for %fs", t.UPID, interval.Seconds())
		}
		time.Sleep(interval)
	}
}
After writing task.Wait(1*time.Second, 10*time.Second) twenty times across the integration tests, I added the lazy
version. Most of the time you just want “poll every second, give up after N seconds”:
var DefaultWaitInterval = 1 * time.Second

func (t *Task) WaitFor(seconds int) error {
	return t.Wait(DefaultWaitInterval, time.Duration(seconds)*time.Second)
}
One thing to be aware of: Wait returning nil means the task is no longer running, not that it worked. A clone
onto storage that’s full stops just as fast as one that succeeds. Check task.ExitStatus after the wait if you care.
You probably do.
Watching the log
Some tasks take long enough that you want to see what they’re doing. A big ISO download is the obvious one. Proxmox
writes progress lines to the task log as it goes. The log endpoint is paged with start and limit. Watch reads
what’s there and hands it back on a channel. Then it tails the log until the task stops:
func tasktail(start int, watch chan string, task *Task) error {
	for {
		task.client.log.Debugf("tailing log for task %s", task.UPID)
		if err := task.Ping(); err != nil {
			return err
		}

		if task.Status != TaskRunning {
			task.client.log.Debugf("task %s is no longer running, closing down watcher", task.UPID)
			close(watch)
			return nil
		}

		logs, err := task.Log(start, 50)
		if err != nil {
			return err
		}
		for _, ln := range logs {
			watch <- ln
		}
		start = start + len(logs)
		time.Sleep(2 * time.Second)
	}
}
There is a small race at the front of this. If you call Watch immediately after starting a task, the log can be
empty for a moment. So Watch retries the first read three times with a one second sleep. After that it gives up with
no logs available. The channel is closed when the task finishes, so you can just range over it.
Putting it together
The integration test fixture for VMs is the best example of all of this in one place. Download a tinycore ISO and wait for it. Create a VM with it attached and wait. Configure it and wait:
isoName := name + ".iso"
task, err := td.storage.DownloadURL("iso", isoName, tinycoreURL)
assert.Nil(t, err)
assert.Nil(t, task.Wait(time.Duration(5*time.Second), time.Duration(5*time.Minute)))

iso, err := td.storage.ISO(isoName)
assert.Nil(t, err)

cluster, err := client.Cluster()
require.NoError(t, err)

nextid, err := cluster.NextID()
require.NoError(t, err)

task, err = node.NewVirtualMachine(nextid, VirtualMachineOption{Name: "cdrom", Value: iso.VolID})
require.NoError(t, err)
require.NoError(t, task.Wait(1*time.Second, 10*time.Second))
And the task test itself covers the rest:
- It downloads an Ubuntu ISO big enough to still be running after 30 seconds.
- It waits on it in a goroutine with a 30 second max, so it has to hit the timeout.
- It stops the task with a
DELETEon the task path. - It reads the
Watchchannel on the main goroutine until it closes.
One test, the whole lifecycle: start, poll, time out, tail, cancel.
That’s the plumbing. Clone landed in February. With tasks working, it and the rest of the VM lifecycle calls are just “post, wrap the UPID, return the task”. The next thing I want on top of it is booting a VM straight from a qcow URL without touching the node’s shell.