
Part of a hobby of mine is running a home lab and using on Proxmox VE to do the virtualization. Since I work in the space I’m slowly trying to build tooling around Proxmox that will let me use the home lab full time for work. Usually my work involves building Kubernetes management tooling, you can imagine waiting for public cloud APIs all day can take away hours of your day at cost to your employer for both your time and the compute resources.
There’s also a real problem today with cloud offerings of Windows. Booting a Windows 2019 or 2022 server in Amazon EC2 today can take up to 4 or 5 minutes before you are given access to the Administrator password. If you build up and tear down constantly the waiting can get tiring. Proxmox just runs qemu under the hood and with snapshotting I Just get everything working and take a quick snapshot. When I want to roll back a cluster for another provision run I can simply shut down the VMs and restore from backup and up and running again in no time.
go-proxmox
To accomplish everything I’ll need I first started out building a Go client for Proxmox.
Go is my primary language and gives everything will need to start from a well-built with proper Go types for all responses. This
is in comparison to the most popular Go client which uses map[string]interface{} for everything. Beyond mapping REST endpoints
to structs the real power of the client will be to build in functions to more easily automate things PVE gives you access too
but forces you to the host cli as they haven’t built the tooling into their API/UI yet.
A great example of this is loading a VM from a qcow disk image. A wonderfully simple image format and the way we want to use them for work is to specify a local network storage URL and tell Proxmox to pull and build a VM from the image, all things possible in qemu directly on the host as per Jamie Phillips' blog post which outlines the idea.
xterm.js Backwards Engineering
I wanted to recreate what the UI was doing to get on to a host, it’s native and works right out of the box with no extra additions to Proxmox after installation. Back tracing how some of this worked I went down some rabbit holes looking into implementing a VNC client in Go. There are some people who have built have some packages 1 2 but all I was trying to do is get on the Debian host and make some calls and this was overkill.
I traced back the xterm.js functionality built into the UI and landed on exactly what I needed… for reference here is the entire `main.js file I found used and I’ll walk you through how I backwards engineered it in Go and got exactly what I wanted.
Step 1, websocket connection
Grab gorilla/websocket and negotiate the connection. While reading the implementation you notice quite quickly they reuse xterm.js for nodes, qemu and lxc. This was huge because it meant I could implement this code once and get triple the usage. There is a limitation to using this with qemu but the host nodes and lxc work right out of the box. I opened the shell to a node and started backwards engineering the UI requests.
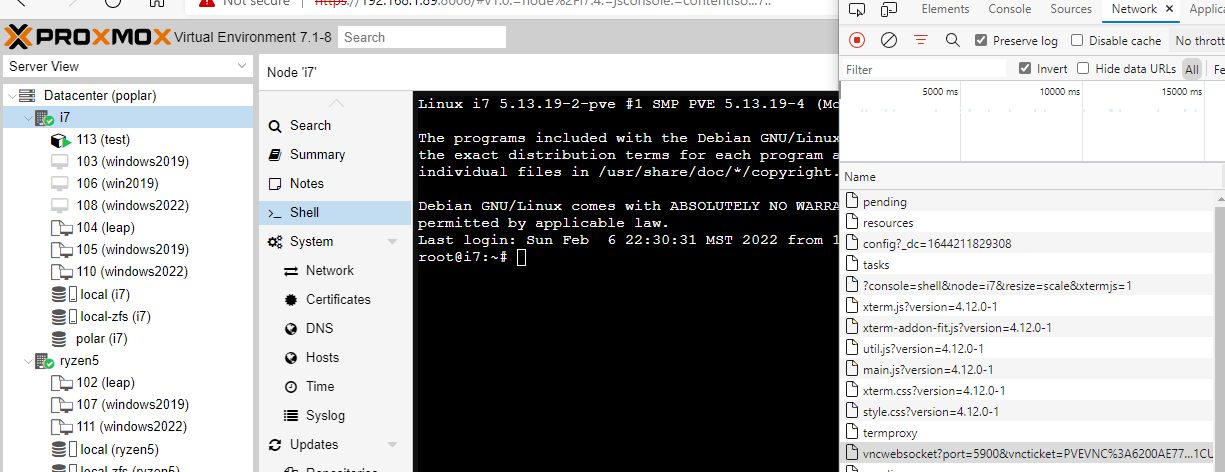
You can see in the bottom right there is a call to termproxy then immediately to vncwebsocket. This was easily confirmed
by the Proxmox API docs and validated my suspicious that this
code could be reusable as node (termproxy
vncwebsocket), qemu
(termproxy
vncwebsocket) and lxc
(termproxy
vncwebsocket) all had
duplicate API endpoints. Reading the main.js you can quite clearly see every where socket.send() is called and decode
the login, ping
and data send along with what looks
like a resizer if you make your browser bigger or smaller. This was perfect, everything I needed to get into the host and send shell commands!
Step 2, recreating the login
Recreating the login was trivial, call to the termproxy endpoint results in a response which includes a user and a ticket.
Call to the web socket with those in the get params
and the web socket boots right up, just make sure you pass the PVEAuthCookie
header in the dialer.
The socket only sends/receives binary messages so the next step is to start negotiating the web socket to elevate your permissions to send commands to the host. The first thing the Javascript did was login again via the socket and in Go after connected simply do
err := conn.WriteMessage(websocket.BinaryMessage, []byte(vnc.User+":"+vnc.Ticket+"\n"))
if err != nil {
	// handle
}
Read the next message for OK response from the server…
_, msg, err := conn.ReadMessage()
if err != nil || string(msg) != "OK" {
    // handle
}
That’s it for connecting and logging into the websocket, you can now start sending commands
Step 3, adding functionality
Go lets you effortlessly manage the concurrency of a web socket and give you some standard interfaces for someone implementing the client’s VNC Web Socket feature. To do this I setup standard string channels for send/receive and an additional errors channel. Since you need to close everything when you’re done I also added a helpful closer func to make sure everything is cleaned up and you’re not leaking resources.
The function signature looked like this:
func (c *Client) VNCWebSocket(path string, vnc *VNC) (chan string, chan string, chan error, func() error, error)
And this will let the client manage things the consumer doesn’t care about like the keep alive. To interface with the web
socket you will need to spin off two go routines, one for reading the web socket and one for writing to the web socket.
You can’t concurrently write to a web socket or you’ll panic so try and make sure you’re keeping a clean select statement,
or you will accidentally write to the socket twice.
To perform the keep alive it was quite obvious they’re sending a binary 2 for a ping
so to recreate that I simply added a case for a 30s ticker.
case <-ticker.C:
    c.log.Debugf("sending wss keep alive")
    if err := conn.WriteMessage(websocket.BinaryMessage, []byte("2")); err != nil {
        errors <- err
    }
You also want to close the socket when youre done so another case is a simple CloseMessage with an empty []byte{} which will
only happen when the closer is called by the client implementor.
case <-done:
    if err := conn.WriteMessage(websocket.CloseMessage, []byte{}); err != nil {
        errors <- err
    }
    return
To support terminal resizing I decided to add a height/width calculator and implement a watcher to notify the web socket in the event the user resizes the terminal. To get the terminal size I used buger/goterm. I simply captured the height/width when the func is called and pass it to a go routine to check every second and notify a channel if it changes and obeys the done channel closed by the closer.
type size struct {
    height int
    width  int
}
// start the session by sending user@realm:ticket
tsize := size{
    height: goterm.Height(),
    width:  goterm.Width(),
}

resize := make(chan size)

go func(tsize size) {
    ticker := time.NewTicker(1 * time.Second)
    defer ticker.Stop()
    for {
        select {
        case <-done:
            return
        case <-ticker.C:
            resized := size{
                height: goterm.Height(),
                width:  goterm.Width(),
            }
            if tsize.height != resized.height || tsize.width != resized.width {
                tsize = resized
                resize <- resized
            }
        }
    }
}(tsize)
And catch the resize in a case in the go routine for the web socket send…
case resized := <-resize:
    c.log.Debugf("resizing terminal window: %d x %d", resized.height, resized.width)
    if err := conn.WriteMessage(websocket.BinaryMessage, []byte(fmt.Sprintf("1:%d:%d:", resized.height, resized.width))); err != nil {
        errors <- err
    }
Finally, all we need to do is send/receive messages on the channel. I wanted the implementor to call the VNCWebSocket func
and send and receive strings. I added the channels and handled them by converting to a []byte and sending the message format as specified in the xterm.js version
case msg := <-send:
    m := []byte(msg)
    send := append([]byte(fmt.Sprintf("0:%d:", len(m))), m...)
    if err := conn.WriteMessage(websocket.BinaryMessage, send); err != nil {
        errors <- err
    }
    if err := conn.WriteMessage(websocket.BinaryMessage, []byte("0:1:\n")); err != nil {
        errors <- err
    }
The entire receive go routine is pretty easy but has some nice to have added error checking and is as follows…
go func() {
    for {
        select {
        case <-done:
            return
        default:
            _, msg, err := conn.ReadMessage()
            if err != nil {
                if strings.Contains(err.Error(), "use of closed network connection") {
                    return
                }
                if !websocket.IsUnexpectedCloseError(err, websocket.CloseGoingAway, websocket.CloseAbnormalClosure) {
                    return
                }
                errors <- err
            }
            recv <- string(msg)
        }
    }
}()
Step 4, using the string channels
For simple testing I just tried to gety ls -la, hostname and exit which was basically the following…
vnc, err := node.TermProxy()
assert.Nil(t, err)
send, recv, errs, close, err := node.VNCWebSocket(vnc)
assert.Nil(t, err)
defer close()

go func() {
    for {
        select {
        case msg := <-recv:
            if msg != "" {
                fmt.Println("MSG: " + msg)
            }
        case err := <-errs:
            if err != nil {
                fmt.Println("ERROR: " + err.Error())
                return
            }
        }
    }
}()

send <- "ls -la"
time.Sleep(10 * time.Second)
send <- "hostname"
time.Sleep(10 * time.Second)
send <- "exit"
time.Sleep(5 * time.Second)
It ends up looking quite easy, just grab the TermProxy vnc response which includes the ticket, pass to VNCWebSocket and
you get your string channels, error channel and a closer. Start a go routine to watch the receive and error channels and
start sending messages to the send channel.
Step 5, testing…
The output from my test looked like the following with all debug enabled and you can see you can interact with the host with no restrictions right from Go.
[DEBUG] [WSS] wss://192.168.1.87:8006/api2/json/nodes/i7/vncwebsocket?port=5900&vncticket=*****
[DEBUG] sending terminal size: 55 x 134
[DEBUG] sending: ls -la
MSG: ls -la

MSG: Linux i7 5.13.19-2-pve #1 SMP PVE 5.13.19-4 (Mon, 29 Nov 2021 12:10:09 +0100) x86_64

The programs included with the Debian GNU/Linux system are free software;
the exact distribution terms for each program are described in the
individual files in /usr/share/doc/*/copyright.

Debian GNU/Linux comes with ABSOLUTELY NO WARRANTY, to the extent
permitted by applicable law.

MSG: Last login: Sun Feb  6 18:27:16 MST 2022 on pts/0

MSG: root@i7:~# ls -la

MSG: total 49
drwx------  3 root root    9 Dec  9 12:40 .
drwxr-xr-x 18 root root   24 Sep 10 18:30 ..
-rw-------  1 root root 2279 Feb  6 18:27 .bash_history
-rw-r--r--  1 root root  571 Apr 10  2021 .bashrc
-rw-r--r--  1 root root   25 Sep 10 18:29 .forward
-rw-r--r--  1 root root  161 Jul  9  2019 .profile
-rw-------  1 root root 1024 Sep 10 18:34 .rnd
drwxr-xr-x  2 root root    6 Sep 10 18:31 .ssh
-rw-r--r--  1 root root  206 Jan 23 08:41 .wget-hsts

MSG: root@i7:~#
[DEBUG] sending: hostname
MSG: hostname

MSG: i7

MSG: root@i7:~#
[DEBUG] sending: exit
MSG: exit
MSG:

MSG: logout

--- PASS: TestNode_TermProxy (26.17s)
Wrap Up
Time to build more tooling on top of this which I’m hoping one day will be a terraform provider, a Terminal UI and a Machine Driver.
Comments